
When we created Hacking UI, I wanted to figure out the perfect technical setup for a large blog. I wanted to know exactly how the best blogs were built, where they were hosted, what software they used and how they were developed. However, I didn’t find much on the subject.
Today, we’ve reached a point with the Hacking UI infrastructure that I can finally say it works well, is highly scalable, and is easy to deploy.
That’s not to say that it’s perfect. Actually far from it. But I do think that after two and half years, several iterations, design changes and one host change, sharing a peek under the hood of Hacking UI could be helpful to others.
In this article I’ll share with you the actual tools, frameworks, plugins and infrastructure that we use for Hacking UI so that you can build your own blog, if you wish. I’ll also share with you my complete local development environment and let you download the theme and settings that I use for my favorite IDE, PHPStorm.
A Brief Overview
- We have a WordPress blog hosted on Heroku, which uses a completely custom Hacking UI theme that we developed and slowly improved over the years.
- We have an interesting Git setup, which we’ve improved over the years to allow us to manage multiple sites easily.
- We only rarely use WordPress plugins, but the ones that we have installed are immensely valuable.
- We programmatically use WordPress through the new WP REST API to do tons of cool, time-saving stuff.
- I created a solid system for local development.
- We use SendGrid for transactional mail and MailChimp for our newsletter.
The CMS
We went with the classic choice – WordPress. Almost everyone knows WordPress, and most people who have worked in tech before have at least played around with it. It is by no means the perfect platform, but it gets the job done, has a large and active community, is fully extendable and is used by many, if not most, of the largest blogs on the Internet.
I had also built several WordPress sites before and already had experience customizing it. I looked into a few other blogging platforms but it didn’t make sense to take the risk on something new at the time.
A word about WordPress plugins
Don’t use them.
Just kidding, but you seriously have to be careful. Here are just a few of the problems I’ve run into with WordPress plugins, both free and paid:
- Not compatible with Heroku’s ephemeral filesystem (will get into that later)
- Not compatible with another plugin
- Not compatible with the latest version of WordPress I just upgraded to
- Loads a crazy amount of stylesheets or javascript files on every page and slows down the site, even though I only need this plugin on one page (this is a general problem with how WordPress plugins work, but is still a real bummer)
- Doesn’t work on mobile
- Has a critical bug in Firefox
- Adds content by hooking into a certain WordPress filter, which makes it hard to add your own content in template files
- Not able to style it’s content in a way that fits our theme
- The latest version has breaking changes, even though according to the semantic version number this was a minor change
As a general rule, if the plugin does something fairly simple, just bite the bullet and write the code for it yourself. You’ll remember this next time you’re stuck on WordPress version 4.1 for months and can’t upgrade to get all of the security patches and new features because that stupid Facebook share button plugin you added crashes the site.
With that said, here are the plugins we use today:
- All in One SEO Pack – Easy set up of sitemap, social sharing presentation of each post, and lots of other related features.
- Disqus – For better comments than the standard WordPress system
- MailChimp for WordPress (Premium) – We use this to set up all of our “content upgrades” on blog posts. We struggled with MailChimp automation through the site for a while. This is the first plugin we found that really worked well and did exactly what we need. It costs $49 but was well worth it for all of the time saved.
- Public Post Preview – So we can share what the post will look like with guest authors before we actually publish it
- WordPress Related Posts – Comes up with related post suggestions on it’s own (will probably remove in the future)
- WP Author Box Lite – Adds simple author info at the end of the post (will probably remove in the future)
- WP Read Only– for connecting WordPress to Amazon S3
- Sendgrid – for transactional mail
Programmatically Using WordPress
The WP Rest API is the single best feature to come to WordPress since I started using the platform (around version 2.8). The API lets you programmatically do all sorts of things that you had to previously do manually in the WordPress admin.
We use it for automatically creating posts out of each of our links in the weekly newsletter. We collect and add links to resources and articles throughout the week to a google spreadsheet, and each Thursday when we publish the newsletter, I push a single button on a google apps script to publish them to WordPress.
The Google Apps script sends a request to the API, which then creates a custom post type for each link with the corresponding tag and newsletter issue. It was a little tricky working with the API at first but the time investment upfront was 100% worth it and has exponentially increased our productivity.
We will soon add the event listings in our newsletter to our website using the same method.
Hosting and Server
The site sits on Heroku, running NGINX and HHVM. I forked the Heroku infrastructure from the heroku-wp repo on github (thank you!).
Heroku is great because all you need to understand in order to use it is Git. Deploying your project is as simple as Git push. To be honest, I can’t imagine ever having to go back to another host.
Another reason why I love Heroku is because you can create as many apps as you want for free, and only start paying for the ones that you need to scale. The Hacking UI production app costs $25 a month for one mean, green, killing machine server and another $9 a month for the larger MySQL database size. I currently have 3 different staging apps live and they all are running for free.
We also use CloudFlare. I don’t see any reason reason not to use it. It’s completely free for everything we need and does awesome things to speed up your site like automatically minifying your assets, alerting you of security threats, managing your DNS (which comes in handy when you need to add stuff to allow google apps to use your domain for mail or authenticate the domain with MailChimp). When deploying new CSS or JavaScript changes though, you must remember to clear the cache, or else the old files will still be served. This one got me a couple of times.
All of our images and media are stored on Amazon S3, which costs us only about $5 a month for the amount of bandwidth we need. This was a huge help when we switched hosts a couple years ago, because we didn’t need to copy over our gigantic uploads directory or deal with any url changes for the images. The WPRO plugin handles all of the configuration to support S3 on Heroku.
Caching
We use the free tier of the Heroku Memcached addon, and it’s working just fine. The Heroku buildpack also comes with the batcache plugin built in, which does full page caching and speeds things up even more.
To be completely honest though, this is one area that I’m certainly not an expert in. I’m sure there’s room for improvement here, but for the time being it works well enough and was incredibly easy to set up.
Version Control
There are two separate Git repositories required for the site to run: one for the WordPress infrastructure and another for the theme itself.
This Git setup is fairly new. I needed to rethink the structure when we decided to launch Hacking Revenue. I wanted to be able to
- Deploy changes to the 2 sites separately
- Actually have 2 different sites (meaning text changes, functionality changes, etc.)
- Share the base infrastructure while being able to test and use updates I make to it on both sites as easily as possible
A big piece of the puzzle that allows this all to happen is Composer, PHP’s package manager. Inside of the infrastructure repository sits a composer.json file where I define the versions of all packages needed for the project.
When you deploy to Heroku, it automatically runs composer install and loads these packages in the correct directories. All of the plugins and themes are loaded as packages. Even WordPress itself is a package. Making use of semantic versioning with the tilde symbol (~) in front of the package’s version number, you can easily get minor updates to your packages by running composer install and then deploying the new composer.lock that is generated.
This is how I deploy the Hacking UI theme as well. Since it sits in it’s own Github repository, I just list it as a package in the composer.json file and point the version to my master branch. Each new website, such as hackingrevenue.com, is a child theme added to the infra repo.
The deployment flow goes like this:
- Commit changes toHacking UI theme
- Git push master branch
- Switch to a terminal window inside of the infra repo and then:
- Run
composer install --ignore-platform-reqs. This checks for and downloads the latest version of the theme and then generates a new composer.lock file with the version hash that correlates to the latest changes - Git commit the new composer.lock changes in the infra repo
- Git push to the Heroku remote of the site I want to deploy
Developing and Running It Locally
I’ve recently changed my mind about the best way to develop and run the environment locally. In the past I wanted to have my local environment exactly mirror the production environment, because I thought that would be the best way to catch bugs early. I used a very complicated set up involving vagrant in order to create a linux machine, run memcached and HHVM and build the project.
I’ve since realized that this was totally the wrong way to go. Now I use a much simpler set up for my local environment.
I created a new WordPress directory and load the Hacking UI theme into the themes directory. I then just use MAMP to run Apache and MySQL and edit the theme.
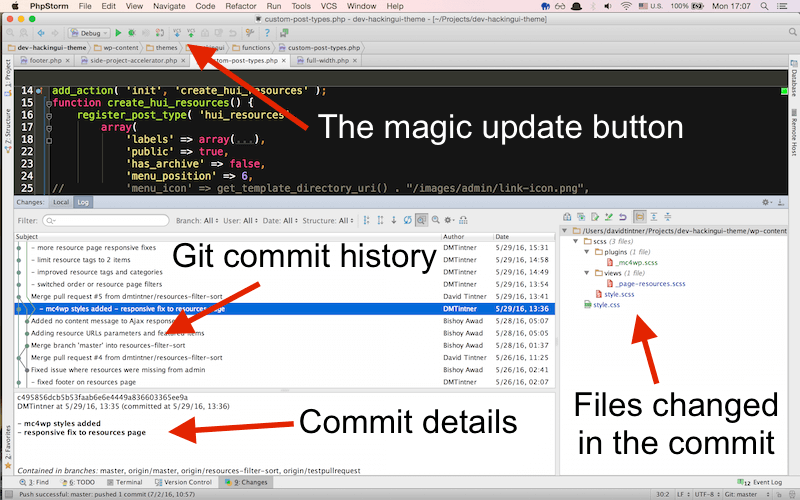
I do all of my coding in PHP Storm. It’s by far the best IDE for PHP I’ve found and has a beautiful integration with Git. If you’re stuck on Sublime, or some other text editor that pretends to be an IDE, I highly suggest you give it a chance.
For syncing my code with the Git branch, the blue arrow update button is a huge time saver. This button does the following process:
- Git Stash your local changes (so even if you are not ready to commit you can still update the code)
- Git fetch to check for changes on your remote branch
- Git rebase (you can change this to pull, if you want but I prefer rebase for a cleaner history)
- Git unstash – puts your local changes right back where they were.
If you have any conflicts with the updated code, it notifies you and allows you to select the correct changes using a very intuitive 3-screen popup.
For committing and pushing code, I’ve added the following keyboard shortcuts:
Git commit- CMD + K
Git push- CMD + SHIFT + P
I’ve also spent a ton of time refining the theme I use inside of the IDE. I’m talking about the fonts, syntax highlighting, more keyboard shortcuts, layout, etc. I firmly believe that you should take the time to invest in your coding environment. It will pay off in the future.
[mc4wp_form id=”28891″]
CSS
We use SCSS on the Hacking UI theme. To compile it to CSS I use Compass, however this is just because I’ve been too lazy to switch to using Grunt. It’s in our Trello backlog though, I promise!. That means that in the meantime in order to develop the theme we need to run compass locally and commit the compiled css file.
In the future the compiled css file will not even be in the Git repository and there will be a grunt task that automatically runs in the Heroku build whenever we deploy a new version.
For our personal mail we use Google Apps. One drawback of Heroku compared to other hosts is that it does not come with a mail server. So we pay for Google Apps for Work to connect our emails to the hackingui.com domain. Each user costs $5 a month and we get additional benefits with it such as 30gb of storage each in google drive. This also means we can directly manage our mail in inbox or gmail instead of having to forward it to another address or use an email client from 1997. I think the simplicity and security are worth the price.
For our newsletters we use MailChimp. We authenticated the hackingui.com domain by adding a couple of records to our DNS. All mail comes from our holla email address, which is just an alias, so that we don’t have to pay for an additional user in google apps.
For transactional mail on the website we use the Heroku SendGrid addon and the SendGrid WordPress plugin. All free and ridiculously easy to set up.
What I want to do in the future
- Create more websites. We plan on continuing to build out the Hacking brand, and will launch new sites with content on other subjects related to technology, design and business.
- Try out Ghost. I love what the Ghost team is doing and I’ve been following this project since they launched. A full-featured, modern CMS built on Node.JS sounds like a dream come true. I’d love to play around with it and if it works well, switch our infrastructure to use it instead of WordPress.
- Use a CDN for serving images. Will probably go with Amazon CloudFront, since we’re already using S3. I checked into this only briefly and saw a couple of issues with the WPRO plugin we use, and stopped before going deeper down that rabbit hole. As soon as I have some time I’m sure I’ll get back to setting this up since I really want to improve our performance, especially since we serve some large images and GIFs.
- I want to add the ability to customize everything in the theme through an admin interface instead of having to hardcode the changes. This will make us that much more scalable and free up my time, since the non-developers will be able to make all of the changes they need.
- Use a task runner like grunt/ gulp and eliminate the need for compass. I feel like we’re the last website on the Internet that’s still using Compass, so this has to go. Just a matter of time.